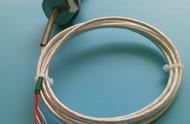
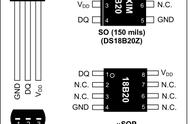
DS18B20程序流程图
我们根据上面流程图采用单总线库:OneWire完成程序编写
#include <OneWire.h>
OneWire  ds(12);  // 连接arduino12引脚

void setup(void)
{
  Serial.begin(9600);
}

void loop(void)
{
  byte i;
  byte present = 0;
  byte type_s;
  byte data[12];
  byte addr[8];
  float celsius, fahrenheit;

  if ( !ds.search(addr))
  {
    Serial.println("No more addresses.");
    Serial.println();
    ds.reset_search();
    delay(250);
    return;
  }

  Serial.print("ROM =");
  for( i = 0; i < 8; i  )
  {
    Serial.write(' ');
    Serial.print(addr, HEX);
  }

  if (OneWire::crc8(addr, 7) != addr[7])
  {
      Serial.println("CRC is not valid!");
      return;
  }
  Serial.println();

  // the first ROM byte indicates which chip
  switch (addr[0])
  {
    case 0x10:
      Serial.println("  Chip = DS18S20");  // or old DS1820
      type_s = 1;
      break;
    case 0x28:
      Serial.println("  Chip = DS18B20");
      type_s = 0;
      break;
    case 0x22:
      Serial.println("  Chip = DS1822");
      type_s = 0;
      break;
    default:
      Serial.println("Device is not a DS18x20 family device.");
      return;
  }

  ds.reset();
  ds.select(addr);
  ds.write(0x44,1);         // start conversion, with parasite power on at the end

  delay(1000);     // maybe 750ms is enough, maybe not
  // we might do a ds.depower() here, but the reset will take care of it.

  present = ds.reset();
  ds.select(addr);
  ds.write(0xBE);         // Read Scratchpad

  Serial.print("  Data = ");
  Serial.print(present,HEX);
  Serial.print(" ");
  for ( i = 0; i < 9; i  ) {           // we need 9 bytes
    data = ds.read();
    Serial.print(data, HEX);
    Serial.print(" ");
  }
  Serial.print(" CRC=");
  Serial.print(OneWire::crc8(data, 8), HEX);
  Serial.println();

  // convert the data to actual temperature

  unsigned int raw = (data[1] << 8) | data[0];
  if (type_s) {
    raw = raw << 3; // 9 bit resolution default
    if (data[7] == 0x10) {
      // count remain gives full 12 bit resolution
      raw = (raw & 0xFFF0)   12 - data[6];
    }
  } else {
    byte cfg = (data[4] & 0x60);
    if (cfg == 0x00) raw = raw << 3;  // 9 bit resolution, 93.75 ms
    else if (cfg == 0x20) raw = raw << 2; // 10 bit res, 187.5 ms
    else if (cfg == 0x40) raw = raw << 1; // 11 bit res, 375 ms
    // default is 12 bit resolution, 750 ms conversion time
  }
  celsius = (float)raw / 16.0;
  fahrenheit = celsius * 1.8   32.0;
  Serial.print("  Temperature = ");
  Serial.print(celsius);
  Serial.print(" Celsius, ");
  Serial.print(fahrenheit);
  Serial.println(" Fahrenheit");
}
程序还是蛮复杂的,不过我们有更简单的办法:使用DS18B20程序库:DallasTemperature。
#include <OneWire.h>
#include <DallasTemperature.h>

// 定义DS18B20数据口连接arduino的12号IO上
#define ONE_WIRE_BUS 12

// 初始连接在单总线上的单总线设备
OneWire oneWire(ONE_WIRE_BUS);
DallasTemperature sensors(&oneWire);

void setup(void)
{
  // 设置串口通信波特率
  Serial.begin(9600);
  Serial.println("Dallas Temperature IC Control Library Demo");

  // 初始库
  sensors.begin();
}

void loop(void)
{
  Serial.print("Requesting temperatures...");
  sensors.requestTemperatures(); // 发送命令获取温度
  Serial.println("DONE");

  Serial.print("Temperature for the device 1 (index 0) is: ");
  Serial.println(sensors.getTempCByIndex(0));
}
这样是不是简单多了呢,你可以接上数码管,液晶屏等显示设备,就完成一个温度计的制作了。