- 三、自定义场景启动器 -
现在我们已经了解了场景启动器的概念以及其隐藏在背后的自动配置的原理,我们就可以自己来对SpringBoot进行功能拓展,定义我们自己的场景启动器。
3.1 starter的命名规范官方命名空间
- 前缀:spring-boot-starter-
- 模式:spring-boot-starter-模块名
- 举例:spring-boot-starter-web、spring-boot-starter-jdbc
自定义命名空间
- 后缀:-spring-boot-starter
- 模式:模块-spring-boot-starter
- 举例:mybatis-spring-boot-starter
通过上边的介绍,可以总结starter的整体实现逻辑主要由两个基本部分组成:
xxxAutoConfiguration:自动配置类,对某个场景下需要使用到的一些组件进行自动注入,并利用xxxProperties类来进行组件相关配置
xxxProperties:某个场景下所有可配置属性的集成,在配置文件中配置可以进行属性值的覆盖
按照SpringBoot官方的定义,Starer的作用就是依赖聚合,因此直接在starter内部去进行代码实现是不符合规定的,starter应该只起到依赖导入的作用,而具体的代码实现应该去交给其他模块来实现,然后在starter中去引用该模块即可,因此整体的starter的构成应该如下图所示:

可见starter模块依赖了两部分,一部分是一些常用依赖,另一部分就是对自动配置模块的依赖,而xxxAutoConfiguration与xxxProperties的具体实现,都封装在自动配置模块中,starter实际是通过该模块来对外提供相应的功能。
首先所有的自动配置模块都要引入两个jar包依赖:
<dependencies>
<dependency>
<groupId>org.springframework.boot</groupId>
<artifactId>spring-boot-autoconfigure</artifactId> //包含很多与自动配置相关的注解的定义,必须要引入
</dependency>
<dependency>
<groupId>org.springframework.boot</groupId>
<artifactId>spring-boot-configuration-processor</artifactId> //非必须的,引入后可以在配置文件中输入我们自定义配置的时候有相应的提示,也可以通过其他.properties文件为相关类进行属性映射(SpringBoot默认使用application.yml)
<optional>true</optional>
</dependency>
<dependencies>
其他依赖的选择根据项目需要进行添加即可
3.3.2 xxxAutoConfiguration的实现autoconfigure模块中最重要的就是自动配置类的编写,它为我们实现组件的自动配置与自动注入。
在编写自动配置类的时候,我们应该要考虑向容器中注入什么组件,如何去配置它。
@Configuration
@ConditionalOnxxx
@ConditionalOnxxx//限定自动配置类生效的一些条件
@EnableConfigurationProperties(xxxProperties.class)
public class xxxAutoConfiguration {
@Autowired
private xxxProperties properties;
@Bean
public static BeanYouNeed beanYouNeed() {
BeanYouNeed bean = new BeanYouNeed()
bean.setField(properties.get(field));
bean.setField(properties.get(field));
bean.setField(properties.get(field));
......
}
}
这是跟配置文件相绑定的类,里边的属性就是我们可以在配置文件中配置的内容,然后通过@ConfigurationProperties将其与配置文件绑定:
@ConfigurationProperties(prefix = "your properties") //使用@ConfigurationProperties注解绑定配置文件
public class xxxProperties {
private boolean enabled = true;
private String clientId;
private String beanName;
private String scanBasePackage;
private String path;
private String token;
}
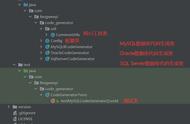
在resource目录下新建META-INF文件夹,在文件夹下新建spring.factories文件,并添加写好的xxxAutoConfiguration类:
org.springframework.boot.autoconfigure.EnableAutoConfiguration=\
com.meituan.xframe.boot.mcc.autoconfigure.xxxAutoConfiguration
starter模块中只进行依赖导入,在pom文件中添加对autoconfigure模块的依赖,并添加一些其他必要的依赖项:
<dependencies>
================================================================
添加了对autoconfigure模块的引用
<dependency>
<groupId>com.test.starter</groupId>
<artifactId>xxx-spring-boot-autoconfigure</artifactId>
</dependency>
===============================================================
其他的一些必要依赖项
<dependency>
<groupId>commons-collections</groupId>
<artifactId>commons-collections</artifactId>
</dependency>
</dependencies>
这两个模块都开发完成之后,通过mvn install命令或者deploy命令将包发布到本地或者中央仓库,即可直接在其他项目中引用我们自定义的starter模块了
作者 | 威尼斯的泪H来源 | csdn.net/qq_21310939/article/details/107401400,