SpringBoot
springboot的目的是为了简化spring应用的开发搭建以及开发过程。内部使用了特殊的处理,使得开发人员不需要进行额外繁锁的xml文件配置的编写,其内部包含很多模块的配置只需要添加maven依赖即可使用,这项功能可谓对开发人员提供了大大的好处。使用springboot只需要简单配置一下就可以完成之前复杂的配置过程。可以到https://start.spring.io/此网站上,下载一个最简单的springboot应用,然后一步一步实现自已的应用。

可以看出当前的稳定版本为2.1.0,点击Generate Project 按钮,即可下载一个可用的springboot应用。

这个是我下载下来后,双击后出来的。可以看出以工程是一个基于maven的项目。你可以将其解压到任何一个目录下,通过eclipse或其他IDE进行导入后运行,eclipse导入流程为File->import->maven->existing maven projects,查找到自己的项目目录。也可以基于此工程来建立自已的maven项目。
下面以建立自己的maven项目
建立自己的springboot项目
- 创建工程
在建立项目时,可以创建一个多模块聚合项目,即在创建项目时选中

选择为pom。
创建后的工程结构为


- jar包依赖
- 打开从springboot官网中下载下来的工程目录,打开pom.xml文件
<parent> <groupId>org.springframework.boot</groupId> <artifactId>spring-boot-starter-parent</artifactId> <version>2.1.0.RELEASE</version> <relativePath/> <!-- lookup parent from repository --> </parent> <properties> <project.build.sourceEncoding>UTF-8</project.build.sourceEncoding> <project.reporting.outputEncoding>UTF-8</project.reporting.outputEncoding> <java.version>1.8</java.version> </properties>
将此段代码复制到 spring-boot-study工程中的pom文件中
将下面的依赖复制到spring-boot-web工程中的pom文件中
<dependencies> <dependency> <groupId>org.springframework.boot</groupId> <artifactId>spring-boot-starter</artifactId> </dependency> <dependency> <groupId>org.springframework.boot</groupId> <artifactId>spring-boot-starter-test</artifactId> <scope>test</scope> </dependency> </dependencies> <build> <plugins> <plugin> <groupId>org.springframework.boot</groupId> <artifactId>spring-boot-maven-plugin</artifactId> </plugin> </plugins> </build>
eclipse自动完成项目工程的配置。完成后项目中所有需要依赖的jar包自动配置完成。
- 代码编写
- 将application.properties文件拷贝到spring-boot-study项目的resources目录下。文件中的内容暂时先不要管,编写以下代码
@SpringBootApplication @RestController public class WebApplication { @RequestMapping("/hello") public String helloWorld() { return "Hello World"; } public static void main(String[] args) { SpringApplication.run(WebApplication.class, args); } }
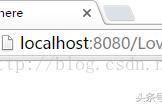
HelloWold就已经完成后。可以在浏览器中输入localhost:8080/hello即可看到效果

springboot默认启动后的端口为8080,但可以在application.properties文件中进行修改。
server.port=9001
将端口修改为9001,重新启动项目后,在浏览器中输入入localhost:9001/hello同样可以看到相同的结果。
- 整合login界面
- 现在后台已经有转发功能,具备web浏览功能。但我们需要访问URL为“/”时跳转到登陆界面,即创建好的登陆界面。本人也是在学习过程中,在网上学习好久才发现使用html的话就使用thymeleaf模板就好了。下面就详细来说说如何使用thymeleaf开发html。
- 在spring-boot-web项目中的pom文件中加上thymeleaf的依赖。
<!-- 加入thymeleaf的支持 --> <dependency> <groupId>org.springframework.boot</groupId> <artifactId>spring-boot-starter-thymeleaf</artifactId> </dependency>
但在Spring Boot项目中,一般src/main/resources/static目录用于存放各类静态资源文件,例如css、js和image等。src/main/resources/templates用于存放页面文件,例如html,jsp等。所以在spring-boot-web中的resources目录下创建static目录与templates目录,并将相应的资源文件放置在各自的目录下。
配置thymeleaf
#thymeleaf spring.thymeleaf.prefix=classpath:/templates/ spring.thymeleaf.suffix=.html spring.thymeleaf.mode=HTML spring.thymeleaf.encoding=UTF-8 spring.thymeleaf.servlet.content-type=text/html spring.thymeleaf.cache=false
html文件修改,增加xmlns:th="http://www.thymeleaf.org" 属性,资源文件的引入要修改。
<link href="../static/css/style.css" th:href="@{/css/style.css}" rel="stylesheet" /> <link href="../static/css/login.css" th:href="@{/css/login.css}" rel="stylesheet" />
然后编写 java代码
@Controller public class IndexController { @RequestMapping("/") public String index() { return "login"; } }
重新启动程序,访问localhost:9001/就可成功跳转至login.html登陆界面上。
注:thymeleaf对html标签要求很严格,每一个标签都需要成对出现。
调试过程中遇到下面异常信息
org.thymeleaf.exceptions.TemplateInputException: Error resolving template [login], template might not exist or might not be accessible by any of the configured Template Resolvers at org.thymeleaf.engine.TemplateManager.resolveTemplate(TemplateManager.java:869) ~[thymeleaf-3.0.11.RELEASE.jar:3.0.11.RELEASE] at org.thymeleaf.engine.TemplateManager.parseAndprocess(TemplateManager.java:607) ~[thymeleaf-3.0.11.RELEASE.jar:3.0.11.RELEASE] at org.thymeleaf.TemplateEngine.process(TemplateEngine.java:1098) [thymeleaf-3.0.11.RELEASE.jar:3.0.11.RELEASE] at org.thymeleaf.TemplateEngine.process(TemplateEngine.java:1072) [thymeleaf-3.0.11.RELEASE.jar:3.0.11.RELEASE] at org.thymeleaf.spring5.view.ThymeleafView.renderFragment(ThymeleafView.java:362) [thymeleaf-spring5-。。。。。。。。。。。
因为错将templates写成templatse导致。
至此实现从后端服务访问到登陆界面的搭建,还没有具体登陆逻辑实现。
,