springboot启动过程中会用到事件发布机制。这里先事件发布说明一下。
Spring中的事件发布机制。网上有一篇文章介绍得很详细,可以参考:https://www.cnblogs.com/takumicx/p/9972461.html
但是在SpringBoot中用的是事件驱动机制,和Spring中的机制有一些区别。

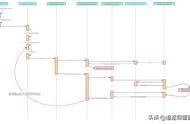
先来从图上整体看下springboot的启动流程。

springboot的监听机制加载执行过程如下:
1:在SpringApplication.run方法中两步:
// 加载监听器
SpringApplicationRunListeners listeners = this.getRunListeners(args);
// 执行
        listeners.starting(bootstrapContext, this.mainApplicationClass);
SpringApplicationRunListeners listeners = this.getRunListeners(args);
  private SpringApplicationRunListeners getRunListeners(String[] args) {
        Class<?>[] types = new Class[]{SpringApplication.class, String[].class};
        // 从spring.factories中加载key为 SpringApplicationRunListener.class对应的value值  并封装成返回的这个类实例  注意这个spring.factoies是在spring-boot.jar里面的
        return new SpringApplicationRunListeners(logger, this.getSpringFactoriesInstances(SpringApplicationRunListener.class, types, this, args), this.applicationStartup);
    }

加载的就一个 EventPublishingRunListener。
this.getSpringFactoriesInstances(SpringApplicationRunListener.class, types, this, args) 这个方法不仅会加载spring.factories中的类,还会进行实例化。而EventPublishingRunListener 只有一个构造器。
public EventPublishingRunListener(SpringApplication application, String[] args) {
        this.application = application;
        this.args = args;
       // 直接new了一个事件发布器
        this.initialMulticaster = new SimpleApplicationEventMulticaster();
        // 这里取的就是 上面spring.factories中加载出来的ApplicationListener 监听器
        Iterator var3 = application.getListeners().iterator();

        while(var3.hasNext()) {
            ApplicationListener<?> listener = (ApplicationListener)var3.next();
          / /添加事件发布器中  方法是在AbstractApplicationEventMulticaster中  会先排除代理类再进行添加
            this.initialMulticaster.addApplicationListener(listener);
        }

    }