作者:徐田原
引言
PostgreSQL官方文档指定了以下三种备份方法,详见:https://www.postgresql.org/docs/current/backup.html
-「SQL转储」,用pg_dump或pgdump_all进行备份,也是一种逻辑备份的方法,这种方法很容易操作,但是缺点就是一旦数据库太大,导入导出文件的效率就会降低。但是有了并行备份恢复和split拆分,也可以在这方面稍微优化。另一个缺点是无法恢复到故障发生的时刻。例如,你使用crontab定时任务在凌晨3点进行备份,结果12点就出故障,如果进行恢复,就会损失9小时的数据。
-「文件系统级备份」,可以在数据目录中执行'一致性快照',然后将快照复制到备份服务器上。这样就可以在异机进行恢复。
-「连续归档和时间点恢复(PRIP)」。要了解PITR,首先必须了解什么是wal,wal代表预写日志文件,基本上对数据库每次插入、更新、删除在实际应用之前,就写入了日志中。这样就算数据库突然出现了crash,在重新启动的过程中,PostgreSQL能够查看wal文件进行恢复并将数据库还原到可用的状态。
实际上PostgreSQL的备份软件有很多种,可以根据实际的需要来选择备份工具
ToolLicenseMakes base backupsMakes base backups from replicasManages backupsCreates replicasMonitors replication delaySupports automated failoverTransport usedSource includes replication testspg_basebackupPostgreSQLYesYesNoManualNoNoPostgreSQL connectionBarmanGPLv3YesYesYesNoNoSSH / S3 / Azure / GCSyesOmniPITRPostgreSQLYesYesNoManualWAL archive delayNorsync / SSHpghoardApacheYesYesYesYesNoNoS3, Azure, Ceph, GCSyespg-rmanBSDYesYesYesManualNoNolocal / NFS mountrepmgrGPLv3NoNoNoYesYesYesrsync / SSHpg_probackupPostgreSQLYesYesYesManualNoNolocal / NFS mountyespitreryBSD-2YesYesYesManualYesYesrsync / SSHongoing
1. pg_dump备份只能备份单个数据库,不会导出角色和表空间相关的信息
-F c备份为二进制格式, 压缩存储. 并且可被pg_restore用于精细还原
-F p备份为文本, 大库不推荐
pg_dump恢复
$ psql dbname -U username < bakfile
或
pg_restore
– pg_restore [option] ... [filename]
– pg_restore -d dbname bakfile
二进制格式的备份只能使用pg_restore来还原, 可以指定还原的表, 编辑TOC文件, 定制还原的顺序, 表, 索引等。
文本格式的备份还原, 直接使用用户连接到对应的数据库执行备份文本即可, 例如
$ psql dbname -f bak.sql
pg_dump备份恢复示例:
1)创建数据库
$testdb=#createdb testdb
2)连入数据库testdb
$ psql testdb
3)创建测试表,插入数据
testdb=# create table tt( espace tbls_t; testdb=# insert into tt(a) 1);
testdb=# insert into t a) val s(2);
4)查看数据
testdb=# select * from tt;
5)备份
$ pg_dump testdb > dm_bk/testdb.sql #简单语法,可结合选项灵活备份
6)删除数据库testdb
$ dropdb testdb
7)创建新数据库(恢复之前需创建数据库)
$ createdb testdb 8)恢复数据
$ psql testdb < dm_bk /testdb.sql 9)查看数据是否回复
$ psql testdb
testdb=# select * from tt;
至此,数据已成功恢复!
pg_dump备份恢复命令扩展:
#二进制格式备份文件:-F c
$ pg_dump -F c -f testdb.dmp -C -E UTF8 -h 127.0.0.1 -U postgres testdb
#文本格式备份文件:-F p
$ pg_dump -F p -f testdb.p_dmp -C -E UTF8 -h 127.0.0.1 -U postgres testdb
$ pg_restore testdb.dmp -f testdb.sql #可以以解析为文本内容,类似于pg_dump备份
$ pg_restore -l testdb.dmp #查看二进制文件中的内容
$ pg_restore -l testdb.dmp > toc.data #查看控制信息
$ pg_restore -d testdb testdb.dmp #把dump文件中的数据导入到testdb数据库中
$ pg_restore -d postgres testdb.dmp #把dump文件中的数据导入到postgres数据库中
利用toc文件选择性备份恢复:
1)根据二进制备份文件生成toc文件pg_restore -l -f testdb.toc testdb.dmp
2)修改toc文件,用‘;’号注释掉不用还原的内容:
3)以toc文件列表做恢复
pg_restore -F c -L testdb.toc -d testdb testdb.dmp
4)检查发现t1表没有被导入。
使用unix管道压缩备份恢复:
1)导出并且压缩
pg_dump testdb |gzip testdb.sql或者:
pg_dump testdb >testdb.sql |gzip testdb.sql
2)解压并且导入,压缩文件不变:
gunzip -c testdb.sql.gz |psql testdb #导入到testdb数据库
3)备份后直接进行恢复,文件不落地,把testdb数据库的表导入到testdb1:pg_dump testdb| psql testdb1
4)并行备份恢复
pg_dump -Fd -j4 -f testdb.p.dump testdb
5)并行导入到testdb1数据库中,j参数指定同时几个进程来同时执行,每个进程同时只处理一个表的数据:
pg_restore -d testdb1 -j4 testdb.p.dump
6)导出指定的表
pg_dump -d testdb -t emp -t dept > dm_bk/emp_dept.sql
7)导出排除指定的表的数据库
pg_dump -d testdb -T emp > dm_bk/testdb_ex_emp.sql
2. pg_dumpall备份恢复
pg_dump只能备份单个数据库,而且恢复的时候需要创建空数据库。
pg_dumpall可以备份所有数据库,并且备份角色、表空间。
1)创建数据库
$ createdb db1
$ createdb db2
2)db1中创建表并插入数据
$ psql db1
db1=# create table tb1(a int); db1=# insert into tb1(a) values(1);
3)db2中创建表并插入数据
psql db2
db2=# create table tb2(a int); db2=# insert into tb2(a) values(2);
4)备份数据库
pg_dumpall > db_all.sql
5)删除数据库dropdb db1 dropdb db2
6)恢复数据库
psql < db_all.sql #如果遇到当前有数据库或者表,会提示表已经存在,数据照常导入。psql –f db_all.sql
7)查看数据库db1是否恢复
psql db1
testdb=# select * from tb1; a
--- 1
(1 rows)
8)查看数据库db2是否恢复
psql db2
testdb=# select * from tb2; a
--- 2
(1 rows)
至此,数据已成功恢复!
3. pg_dump备份压缩与分割
压缩与分割的原理都是利用Linux的管线(PIPE)命令。
1)压缩备份
pg_dump testdb| gzip > filename.gz
2)恢复
gunzip -c filename.gz | psql dbname
3)分割备份
pg_dump dbname | split -b 1m
4)恢复
cat filename* | psql dbname
4. copy导入导出
语法COPY命令概述
copy 命令用于表与文件(和标准输出,标准输入)之间的相互拷贝;
copy to 由表至文件,copy from 由文件至表;
copy 命令始终是到数据库服务端找文件,以超级用户执行导入导出权限要求很高,适合数据库管理员操作;
\copy 命令可在客户端执行导入客户端的数据文件,权限要求没那么高,适合开发人员,测试人员使用。
COPY基本语法参考:
Name
COPY -- copy data between a file and a table Synopsis
COPY table_name [ ( column ...] ) ] FROM { 'filename' | command' | STDIN } [ [ WITH ] ( option [, ] ) ]
COPY { table_name column_name [, ...] ) ] | ( query ) } TO { 'filename' | PROGRAM 'command' | STDOUT }
[ [ WITH ] ( option [, ...] ) ]
where option can be one of:
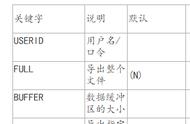
FORMAT format_name OIDS [ boolean ]
FREEZE [ boolean ]
DELIMITER 'delimiter_character' NULL 'null_string'
HEADER [ boolean ] QUOTE 'quote_character' ESCAPE 'escape_character'
FORCE_QUOTE { ( column_name [, ...] ) | * } FORCE_NOT_NULL ( column_name [, ...] ) ENCODING 'encoding_name'
COPY命令示例:
表与文件(和标准输出,标准输入)之间的相互拷贝,类似于Oracle的sqlldr,把文本文件的内容导入到数据库,同时也可以把表的数据导出生成文本文件,实现数据库表和文本文件之间数据的迁移,非常方便,比sqlldr易用性好。
[postgres@db2 ttdata]$ cat	test_copy.txt
1	a
2	b
3	c
注意:上面列之间要用tab键隔开。

[postgres@db2 ttdata]$ psql psql
Type 'help' for help.
testdb=# create table test_copy(id int4,name varchar(32));
testdb=# \copy test_copy from /home/postgres/test_copy.txt ; #把文本数据导入到表中testdb=#\copy test_copy to /home/postgres/test_copy1.txt ; #以tab制表符隔离
testdb=#\copy test_copy to /home/postgres/test_copy1.txt.csv with csv; #以逗号隔离testdb=#\copy test_copy from /home/postgres/test_copy1.txt.csv with csv;
testdb=# copy test_copy from '/home/postgres/test_copy1.txt.csv' with csv;
总结:
copy与\copy命令都能实现数据文件与表的数据传递,两者都在psql环境下执行。主要不同在于数据文件的路径寻址:
1)copy命令始终是到数据库服务端找文件;
2)\copy命令可在客户端执行导入客户的数据文件。
另外,常用的数据文件列之间默认是tab制表符,可以用csv格式,列之间以逗号隔离。
5. 本地外部表1)--添加扩展
CREATE EXTENSION file_fdw;
2)--创建SERVER FOR file
create server pg_file_server foreign data wrapper file_fdw;
3)--创建外部表,与外部文件结构一致
create foreign table emp_file_fdw
(EMPNO int, ENAME varchar(10), JOB varchar(9), MGR int,
HIREDATE DATE,
SAL int, COMM int, DEPTNO int)
server pg_file_server
options(filename '/home/postgres/emp.csv',format 'csv',header 'true',delimiter ',');6. 文件系统级别备份
文件系统级别的备份是冷备份,需要停止数据库。
1)停止数据库pg_ctl -m fast st
2)备份数据库
tar -jcv -f /backup/filesystem.tar.bz2 $PGDATA
3)删除$PGDATA目录
rm -rf $PGDATA
4)解压备份文件到原目录,注意后面的/指的是从根目录开始恢复到指定位置:tar -jxv -f /backup/filesystem.tar.bz2 -C /
5)启动数据库pg_ctl start
6)查看数据库db1是否恢复
psql db1
testdb=# select * from tb1; a
--- 1
(1 rows)
7)查看数据库db2是否恢复
psql db2
testdb=# select * from tb2; a
--- 2
(1 rows)
至此,数据已成功恢复!
7. 在线热备份(归档)
备份分为冷备和热备。冷备是正常关闭服务后拷贝文件。热备是服务正常运行中拷贝文件。
由于采用数据缓冲区机制,拷贝的文件数据会不一致。根据数据库恢复基本原理,只要确定某lsn之前的日志已经全部写入了数据文件,则在拷贝后的数据文件上,应用该lsn号之后的日志文件,可将数据恢复到一致的状态。
7.1 热备步骤
1)执行pg_start_backup函数:该函数执行checkpoint,将checkpoint信息写入数据目录下的backup_label文件,该文件很重要,否则启动实例的时候会提示找不到检查点。同时在归档目录下的会对正在使用的归档日志进行标记。
2)拷贝数据目录到指定位置
3)执行pg_stop_backup函数:该命令删除ackup_label文件,写WAL_BACKUP_END日志,并在pg_wal目录中写入backup该文件记录了热备开始和结束的lsn信息。
backup文件格式为:热备开始的日志文件名.开始lsn的块内偏移.backup
7.2 备份归档配置
1)配置归档模式
配置归档需要编辑postgresql.conf文件,默认为与$PGDATA/目录下
vim $PGDATA/postgresql.conf archive_mode = on
archive_command = ‘cp %p/PostgreSQLbak/archive/%f’
注:%p要被归档的日志文件的路径,%f是要被归档的日志文件的文件名
7.3 pg_start_backup备份案例
1)启动数据库pg_ctl start
2)创建数据库arch createdb arch
3)创建表并插入记录psql arch
arch=# create table tb(a int); arch=# insert into tb(a) values(1);
4)创建备份
arch=# select pg_start_backup('baseline');
pg_start_backup- 0/E000060
(1 row)
观察归档日志目录下的归档文件,会产生一个带有备份标记的归档日志:
00000001000000000000000E.00000060.backup,通过分析,跟备份时的标记是一样的。
5)备份整个data目录
tar -jcv -f /home/postgres/ol_bk/baseline.tar.bz2 $PGDATA
6)停止备份
arch=# select pg_stop_backup();
NOTICE:	all required WAL segments have been archived
 pg_stop_backup 0/E000170
(1 row)
7)插入新记录,然后切换日志3次
testdb=# insert into t1 select * from t1;
INSERT 0 1
testdb=# select pg_switch_wal();
     pg_switch_wal - 0/F0268D8
            (1 row)
arch=# insert into t1 select * from t1;
arch=# select pg_switch_wal();
arch=# insert into t1 select * from t1;
arch=# select pg_switch_wal();
8)把$PGDATA/pg_wal/下的WAL日志文件复制到预设的归档目录/home/postgres/arch下,保证产生的WAL日志都已归档。
7.4 pg_start_backup恢复案例
1)主机断电,导致数据库损坏(如果正常关闭,则会自动把当前的日志归档,就做完全恢复):ps -ef|grep postgres
postgres 8173 1 0 06:30 ? 00:00:00 /usr/local/pgl2.0/bin/postgres
……
Kill -9 8173
2)删除数据库文件:rm -fr $PGDATA/
3)恢复数据库备份:
tar -jxv -f /home/postgres/ol_bk/baseline.tar.bz2 -C /
4)修改/usr/local/pgl2.0/data/postgresql.conf文件,添加如下2行:
restore_command = 'cp /home/postgres/arch/%f %p' recovery_target_timeline = 'latest'
5)启动数据库,数据库会做recovery:pg_ctl start
pg_ctl: another server might be running; trying to start server anyway
waiting for server to start....2021-07-11 06:44:15.456 EST [8255] LOG: starting PostgreSQL 12.0 on x86_64-pc- linux-gnu, compiled by gcc (GCC) 4.4.7 20120313 (Red Hat 4.4.7-23), 64-bit
2021-07-11 06:44:15.457 EST [8255] LOG: listening on IPv4 address '0.0.0.0', port 1922
2021-07-11 06:44:15.457 EST [8255] LOG: listening on IPv6 address '::', port 1922
2021-07-11 06:44:15.460 EST [8255] LOG: listening on Unix socket '/tmp/.s.PGSQL.1922'
2021-07-11 06:44:15.476 EST [8256] LOG: database system was interrupted; last known up at 2021-07-11 05:51:36 EST
2021-07-11 06:44:16.009 EST [8256] LOG: restored log file '000000010000000000000010' from archive
2021-07-11 06:44:16.062 EST [8256] LOG: redo starts at 0/10000060
2021-07-11 06:44:16.075 EST [8256] LOG:  restored log file '000000010000000000000011' from archive
2021-07-11 06:44:16.141 EST [8256] LOG:  restored log file '000000010000000000000012' from archive
2021-07-11 06:44:16.198 EST [8256] LOG:  restored log file '000000010000000000000013' from archive
2021-07-11 06:44:16.252 EST [8256] LOG:  restored log file '000000010000000000000014' from archive
2021-07-11 06:44:16.308 EST [8256] LOG:  restored log file '000000010000000000000015' from archive
2021-07-11 06:44:16.365 EST [8256] LOG:  restored log file '000000010000000000000016' from archive
2021-07-11 06:44:16.422 EST [8256] LOG:  restored log file '000000010000000000000017' from archive
2021-07-11 06:44:16.483 EST [8256] LOG: restored log file '000000010000000000000018' from archive
2021-07-11 06:44:16.626 EST [8256] LOG: invalid record length at 0/18E0E2A0: wanted 24, got 0
2021-07-11 06:44:16.626 EST [8256] LOG: redo done at 0/18E0E228
2021-07-11 06:44:16.643 EST [8256] LOG: restored log file '000000010000000000000018' from archive
2021-07-11 06:44:16.781 EST [8255] LOG: database system is ready to accept connections done
server started
5)查看数据完整性。arch=# select * from tb;
a --- 12
3
4
(4 rows)
至此,数据已经成功恢复!
,